This is a guide for Webzang hosting clients on how to set up their domain email with Gmail as their email client. Gmail withdrew POP support in early 2026 and only offer IMAP on their mobile app.
***A domain email is an email address connected to your website, so for example, my domain email is hello@webzang.co.uk***
You can still use your gmail for your domain email through a slight back door hack:
- Set up an email forwarder on your host mailbox. This sends a copy of every email to your personal Gmail account.
- Configure gmail to be allowed to "SEND AS" your domain.
This effectively means you receive all emails to your Gmail inbox and can also reply to them or send as your domain.
NB, because emails are sent as copies, this means your SOURCE mailbox will eventually become full and you will need to regularly clear it out. Once the mailbox if full, emails won't be forwarded but will just bounce back to the sender.
If you want to use IMAP sync across all devices and you are not wedded to using GMAIL, then we recommend moving your hosting mailbox over to ZOHO MAIL as they are super cheap (less than £10 per year) with a 5GB mailbox and offer full IMAP support. IMAP means that your emails are synced between whatever app you use (like Outlook or Mac Mail) and the server. Gmail doesn not support this option.
You will need your email username (ie your email address) and the password on your account to set this up - we will have sent the password to you. If you have forgotten your password, please let us know and we can do a reset for you.
NOTE - If you already have your domain set up to conect to your personal gmail, then it is even easier to switch - read this guide on how to convert your POP connection to a forwarder.
Step 1 - Set Up email forwarder.
For clients hosted with Webzang, just ask me to do this and I will set it up for you.
For anyone else with a standard Cpanel, go to FORWARDERS in the EMAIL section, and set up a forwarder to your gmail account.
Step 2 - configure Gmail to send as your domain.
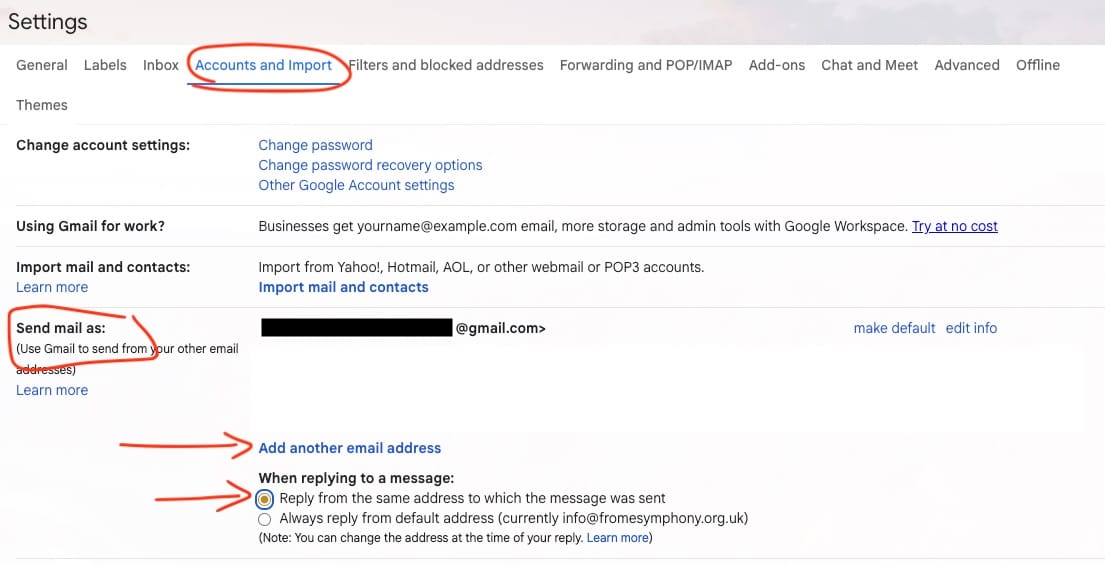
Log in to Gmail and go to Settings
- Log in to your Gmail account.
- Click the gear icon in the top right corner.
- Select See all settings from the drop-down menu.

- Click "Accounts and Import" in the menu at the top.
- Go to the section SEND EMAIL AS
- Ensure you have got "Reply from the same address to which the message was sent" checked. - This means when you hit reply to a message sent to your domain email, it replies from that same email address.
- Then Click "Add an email account".
- Enter the sender name you want to be visible to your recipients, for example "Eleanor from Webzang".
- Click Next.

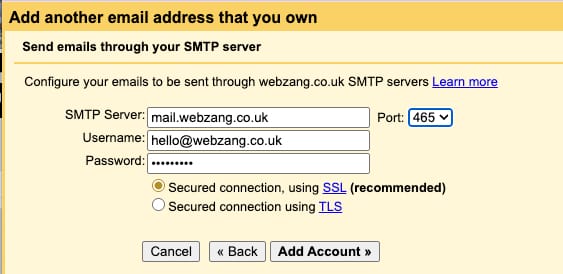
Please use the following settings for the outgoing email: (we will email you these settings)
- SMTP Server: mail.{yourdomain.co.uk} e.g: mail.webzang.co.uk
- Username: your domain email address e.g. hello@webzang.co.uk
- Password: the password we sent you
- Port: 465 (or whichever one your server specifies
- Secured connection: SSL
Click Add Account to continue and on confirmation go to your inbox.
Then you should get a confirmation that the account has connected. If it can't connect, check you have not put any typos anywhere and copied the password without any spaces at the end.
Go ahead and close the window.
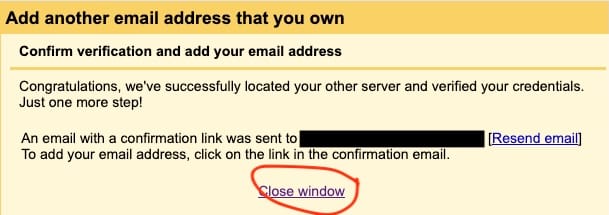
Gmail will now send you an email with a confirmation link. Go back to your inbox and you should see the email with the Subject line: Gmail Confirmation - Send Mail as ....[your domain emai]
- Open the email "Gmail Confirmation - Send mail as..."
- Click the link in the email. This should complete the verification process.
Now send yourself an email FROM your gmail address to your new domain email, and check that it arrives! Also reply to the email to confirm the reply settings are also working.
And that's it! If you have any issues please get in touch so we can help.